Screen 1 – Levels Menu
 You are taken here when the app starts.
It displays all levels. | Select a level to access. Levels can be: - Available – level one and any previously purchased levels
- Locked – you need to purchase it from iTunes store to be able to access its content
Restore button – tap to restore previously purchased levels if they are locked.
Each level consists of three modes: - Lessons (Screens 2+3)
- Puzzles (Screens 4+5)
- Tests (Screens 6+7)
Tap on any Level button to open the Lessons Menu (Screen 2). |
Screen 2 – Lessons Menu
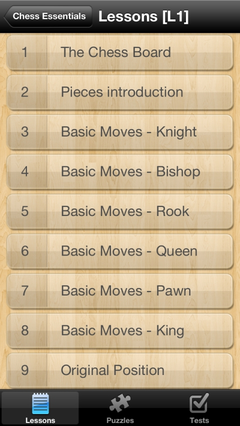 You can reach it from (Screen 1).
It displays the lessons index available for a level. | [L1] on top of the screen indicates the level number.
Chess Essentials button – takes you back to (Screen 1).
Choosing a lesson – tap on a button with the lesson's name.
Switch between lessons, puzzle sets and tests – tap on the bottom respective buttons (Screens 4 and 6). Tap on any Lesson button with a number to open the Lesson Screen (Screen 3). |
Screen 3 – Lesson Screen

You can reach it from (Screen 2).
It displays the chess diagram and text topic explanation under it. | You can scroll the text up/down if it does not fit on the screen. Blue arrows on the diagram are used to help visualize the concepts presented.
In the lesson mode you can read the comments and play moves on the board for both sides.
Example: in the position on the diagram you can make the move Qf6 for White by tapping on Qb6 and then on the f6-field. Then you can make a move for Black by tapping Ne7 and then on the g6-field, and so on.
NAVIGATION buttons:
Red pointer #1 – Target, or Reset Initial Position button – returns to the initial position; all previous moves will be lost.
Red pointer #2 – Flip Board button – switches board orientation: White or Black at the bottom.
Red pointer #3 – returns to the Lessons Menu (Screen 2)
Red pointer #4 – shows on what screen/ position you are now and how many screens/ positions this lesson has in total. This particular lesson contains only one screen: 1/1.
Left/ Right arrows allow you to move between screens/ positions; also the Right arrow also moves you from the last lesson screen to the first puzzle related to this lesson. We recommend you always proceed to the puzzles as soon as you have completed your lesson. This will enable you to put in practice what you learned. |
Screen 4 – Puzzles Menu
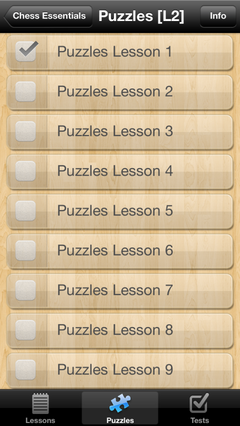 You can reach it from (Screen 2).
It displays the puzzle sets index available for a level. | [L2] on top of the screen indicates the level number.
Chess Essentials button – takes you back to (Screen 1).
Completed puzzle sets get a permanent check mark in the left box; however they remain available for access at any time.
Switch between lessons, puzzle sets and tests – tap on the bottom respective buttons (Screens 2 and 6). Tap on any Puzzle set button with a number to open the Puzzle Screen (Screen 5). |
Screen 5 – Puzzle Screen
 You can reach it from either (Screen 3) or (Screen 4) | Each puzzle contains a task for you to perform. You can play only for one side indicated in the task (usually the side moving first in the suggested position) and if:
a) Your move is correct – the app will play a move for the opposite side right away
b) Your move is not correct – a message will be displayed and you will get another try.
Example: in the position on the screenshot you play for White and should take advantage of the bad position for Ba6. If you do your first move 1.Rxa6, the app will respond 1... Nxa6 and then it continues with 2.Qxc6+ Qd7 3.Qxa8+ and puzzle solved! You will see a corresponding message on the screen; click “OK” and you will get the next puzzle.
NAVIGATION buttons:
Red pointer #1 – returns to the Puzzles Menu (Screen 4)
Red pointer #2 – Light Bulb, or Tip button – makes a correct move in a particular position; if it is not the final move, then the app will respond automatically for opposite side and then you can continue to play for your side.
Red pointer #3 – Target, or Reset Initial Position button – returns to the initial position; all previous moves will be lost. Also used if you are asked to show other possible solutions.
Red pointer #4 – Checkmark, or Check Answer button – it is enabled only for puzzles with multiple choice questions; for such tasks you need to tap on one or more available answers and then tap on Checkmark to complete your answer.
Red pointer #5 – Flip Board button – switches board orientation: White or Black at the bottom.
Red pointer #6 – Numbers & Arrows buttons:
Numbers button – show on what screen you are now and how many screens this puzzle contains in total. This particular case contains 6 puzzles, and right now we are on the puzzle #4: 4/6.
Left/ Right arrow buttons – allow you to move between screens/ positions.
If you came to the puzzle from a lesson mode, the Left arrow button takes you back to the corresponding lesson. If you came to the puzzle from the Puzzles Menu, then this option is not available. You can tap on Puzzle button to go back to the menu, and from there switch to a different mode. |
Screen 6 – Tests Menu
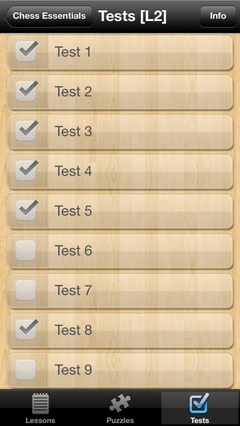 You can reach it only from (Screen 2).
It displays the tests index available for a level. | [L2] on top of the screen indicates the level number. Chess Essentials button – takes you back to (Screen 1).Completed tests get a permanent check mark in the left box; however they remain available for access at any time.
Switch between lessons, puzzles and tests – tap on the bottom respective buttons (Screens 2 and 4). Tap on any Test button with a number to open the Test Screen (Screen 7). |
Screen 7 – Test Screen

You can reach it only from (Screen 6)
| Functionality and navigation of this screen is similar to the Puzzle Screen (Screen 5) with a couple notable differences in the navigation:
NAVIGATION buttons:
Red pointer #1 – Checkmark, or Test button – gets you back to the Tests Menu (Screen 6)
Red pointer #2 – only 1 position is available per test, so Right / Left arrows are always disabled. |